
How to Identify an Air Compressor Part: Six Measurements to Send
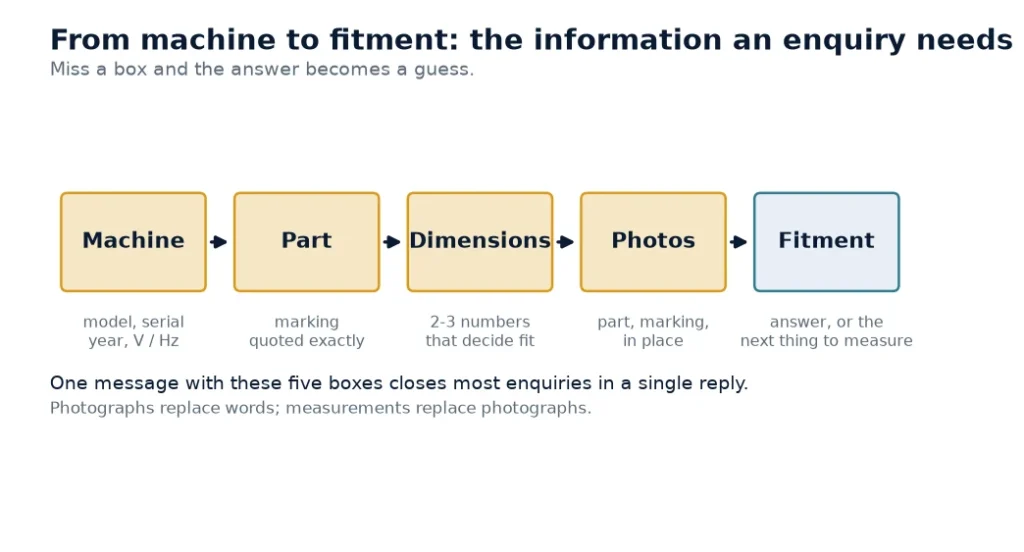
Short answer: a part enquiry succeeds or fails on six numbers and three photos. The numbers are the port size or bolt pattern, the outside diameter, the overall length or height, the bore, the seal or groove dimensions, and the setting or marking stamped on the part. The photos are the part on a clean background with the caliper in frame, the marking close-up, and the part where it sits on the machine. Add the machine’s nameplate details and one reply is usually enough.
We see the failure mode daily. A message arrives asking for the price of a valve with a photograph attached and nothing else, or with a product name typed into the part-number field. It is not a careless customer — it is a customer who has never been told which numbers decide fitment. This page is that list, and it is the same list our own staff work from when they open a valve on a bench.
Why the part number on the casting is not the answer
A number cast or laser-marked on a compressor part is a local identifier. It belongs to whoever assembled the machine, and it identifies the part inside that builder’s catalogue — not the physical object in your hand. The same intake valve body can carry four different numbers depending on who is selling it, and a number from a 2012 build often maps to a superseded part with a different coil or a different spring.
Search results make this worse, because they rank by text similarity. Typing a number into a search engine returns pages whose titles repeat your number and whose dimensions differ. The same problem is documented for filter elements, where cross-referencing is a dimensional exercise rather than a lookup: see matching an air filter element without a part number. Valves behave identically, which is why the measurements below are organised by what actually decides fitment.
The six measurements
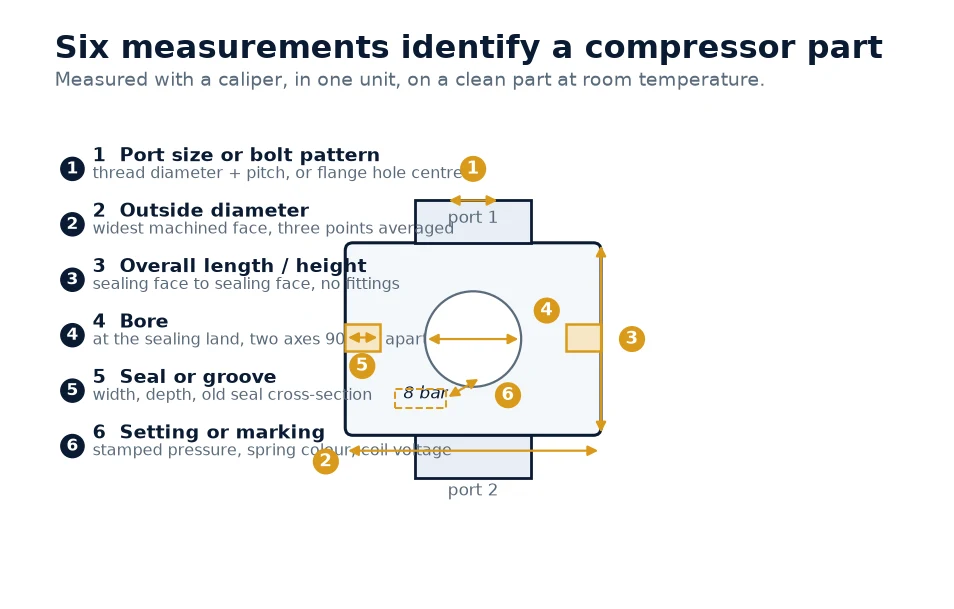
Measure with a caliper, in millimetres, on a clean part at room temperature. Write the numbers down; a photograph of the caliper display alone is not a measurement record.
| # | Measurement | Tool | How to take it | Typical mistake |
|---|---|---|---|---|
| 1 | Port size or bolt pattern | Thread gauge, caliper | Thread diameter and pitch, or flange bore plus hole centre distance | Calling a 1" BSP port a 1" NPT port |
| 2 | Outside diameter | Caliper | Across the widest machined surface, three points averaged | Measuring over paint or a raised weld |
| 3 | Overall length or height | Caliper or rule | Sealing face to sealing face, not including fittings | Including an elbow that will be reused |
| 4 | Bore / inner diameter | Internal caliper or bore gauge | At the sealing land, two axes 90° apart | Measuring a worn bore and ordering to it |
| 5 | Seal or groove dimensions | Caliper, depth gauge | Groove width, depth and the old seal’s cross-section | Measuring a swollen seal as if it were new |
| 6 | Setting or marking | Eyes and a photograph | Stamped pressure, spring colour, coil voltage, flow arrow | Reading a marking through three layers of paint |
Three photographs, in this order
Photographs answer the questions numbers cannot: which body style, how the part is mounted, which end is which.
- The part on a plain background, with the caliper in frame. One photo per side if the part is not symmetric. Daylight or a work lamp, no flash glare on machined faces.
- The marking, close up and in focus. Numbers, logos, pressure stamps, coil labels, an arrow. If the marking is unreadable, say so — a guess written as fact is worse than a blank.
- The part in place on the machine, taken wide enough to show what it connects to. This is the photo that reveals a non-standard flange, an adapted pipe or a valve fitted in the reverse of the normal orientation.
Three photos and six numbers is about six minutes of work. The alternative is two weeks of messages, and a part that arrives with the wrong port thread.
The nameplate carries the fitment
Part dimensions identify the part; the nameplate identifies the machine it has to work in. Five lines matter:
- Model designation as printed, including any suffix.
- Serial number, which usually encodes the build year.
- Motor power in kW or HP, and whether it is the motor or the package rating.
- Voltage and frequency, for example 460 V / 60 Hz. Coil voltages follow this line.
- Rated working pressure and free air delivery.
The frequency line is the one most often left out, and it decides solenoid and contactor coil selection on any machine that was built for a different market. If the machine has been re-powered from 50 Hz to 60 Hz, say so in the first message.
Where measurement goes wrong
Four errors account for most wrong-part shipments we see returned:
- Thread standard. A 1" parallel thread is 11 threads per inch; a 1" tapered pipe thread is 11.5. They look interchangeable and they are not. Measure pitch over at least ten threads and divide.
- Measuring a worn part. A bore that has run for 8,000 hours is larger than the drawing. Measure the unworn land, or state plainly that the number came off a worn part.
- Seal groove width versus seal cross-section. Order by the groove, not by the flattened old seal.
- Metric and inch mixed in one message. Pick one unit and stay in it.
If a part is being replaced because it failed, the failure itself is information. A valve that failed at the stem seal and a valve that failed at the seat need different answers — the five wear measurements we use to decide between rebuilding and replacing an intake valve are set out in the repair kit versus replacement guide.
Two rounds versus one: what a complete enquiry saves
The cost of an incomplete enquiry is not the extra message. It is the two weeks between “what is the port size?” and the reply, and then the second exchange when the shipped part turns out to have a parallel thread where the machine has a tapered one. On a machine that is down, that is the whole repair budget spent on postage.
Worked through, a complete enquiry looks like this. A separator element with no legible marking: outside diameter 118 mm, height 210 mm, bore 62 mm, gasket land 4 mm wide, tank marking quoted as it appears, one photo of the element and one of the tank flange. That is enough to commit to a fitment answer, because the three numbers that decide fitment are all present.
Contrast it with the same enquiry without measurements: a photograph of a used element on a workbench, and a message asking for the price of a separator for a 10 HP compressor. Ten horsepower does not determine element size — two machines of the same power from different builders can use elements 20 mm apart in diameter, and the element is the part that has to seal.
There is a second reason to send dimensions rather than a part number: it keeps the answer honest. When the numbers are on the table, a supplier who does not have the part has to say so. When the only input is a number, the reply can be a plausible-looking equivalent with no basis in measurement, and the mistake surfaces only at installation.
What to measure first, by part family
Not every part needs all six numbers. Start with the two or three that decide fitment for the family in question, then add the rest only if asked.
| Part family | Measure first | Then | Also send |
|---|---|---|---|
| Air / oil filter element | Outside diameter, overall height | Bore, end-cap type | Element marking, housing photo |
| Oil separator element | Outside diameter, height | Bore, gasket land | Separator tank marking |
| Minimum pressure valve | Port sizes both ends | Body length, setting stamp | Photo of the nameplate on the valve body |
| Intake valve | Flange bolt pattern, port size | Coil voltage, body height | Photo of the actuator side |
| Coupling insert | Outer diameter, thickness | Number of lugs, bore of both hubs | Shaft diameters |
| Sensor or switch | Thread size and pitch | Insertion length | Electrical connector type, voltage |
| Controller | Model and suffix on the label | Connector count, supply voltage | Photo of the terminal legend |
A one-message enquiry that gets a fitment answer
Copy this into the first message and most of the follow-up disappears:
- Machine model, serial and year, plus voltage and frequency.
- Part name as you know it, and where it sits on the machine.
- The marking on the part, quoted exactly, with the word unknown where it is unreadable.
- Measurements 1–6 above, in millimetres, with the tool used.
- Three photographs, sent as files rather than pasted into the body.
- Quantity, and whether it is a first fit or a replacement for a failed part.
Two lines make the difference between an answer and a guess: the voltage/frequency line, and an honest “unknown” instead of a plausible number. If the part is one of the small items that get overlooked, the sight glass, return check valve and minimum pressure valve guide also lists what a correct replacement should look like on arrival, and the MPV versus combination valve comparison helps you name the body style before you measure it.
Frequently asked questions
What is the minimum information needed for a part enquiry?
Machine model, serial and voltage/frequency, the marking on the part, and the two or three dimensions that decide fitment for that part family. Photos remove most of the remaining ambiguity.
I only have a photo. Can you identify the part from it?
Usually only to family level, and sometimes not that. A photo shows body style and mounting; it cannot show port thread pitch, seal groove depth or spring rate. That is why the measurement list comes first and the photo second.
The old part has no marking at all. What then?
Then the dimensions are the whole identification. Measure the sealing faces and the port thread carefully, note that the part is unmarked, and photograph the cavity it came out of — the housing often carries a number even when the part does not.
Do I need to measure in millimetres or inches?
Either, as long as the whole message uses one. Millimetres with one decimal place is the least ambiguous, and conversions are ours to make, not yours.
How do I tell a parallel thread from a tapered one?
Count threads over ten pitches and divide to get threads per inch, then check whether the thread diameter grows towards the end. A 1" parallel thread measures 11 TPI, a 1" tapered pipe thread 11.5 TPI, and the two will start to engage without sealing.
These answers cover the common cases. Machine-specific limits always come from the manual of the unit in front of you.
Send the measurements and get a fitment answer
Machine model, voltage and frequency, the marking on the part and the dimensions that decide fitment — that is enough for a first answer. If a number is unknown, say so; we would rather tell you what else to measure than ship a part that almost fits.